Windows 10 is an operating system for computers developed and distributed by Microsoft. For decades, Microsoft Windows has been one of the most successful computer operating systems. The company has been upgrading its OS from time to time, and nowadays, it is planning to launch a new version of Windows.

Whereas Windows has impressive features and remarkable performance, it also has some bugs and code errors. Some Windows users report an error message that says ‘mup_file_system.’ Many people are searching for a solution to this error message. If you are one of them, you have come to the right place to get the answer.

We are going to show you how to troubleshoot the mup_file_system error on Windows 10 in this article. So without wasting any more time, let’s get in.

BSOD Error Mup_File_System Windows 10

The BSOD term is used to refer a specific kinds of error messages and codes on Windows 10. It is also known as the blue screen of death. These errors typically appear with a blue screen in the background. They could stop you from using your computer in a normal way. This error is a part of the blue screen of death errors and could be very dangerous if underestimated.

Therefore we advise you to follow all instructions provided in this article to fix it as soon as possible.

Here are the reliable solutions to fix this problem:

1. Updating Windows Manually

By updating your computer’s Windows, you can fix many issues since this process will automatically upgrade your drivers, corrupted files, and other system data. The Windows update feature can also troubleshoot some errors on your computer by automatically recognizing the ongoing technical issues. It will automatically fix all technical software glitches on your computer. Therefore we recommend you follow the instruction given below to force your computer to update manually:

  1. launch the start menu on your computer by pressing the Windows button on your keyboard.
  2. When the start menu appears, please search for Windows update.
  3. Select the first option when the result appears.
  4. This will take you to the windows update settings.
  5. Please click on check for updates and make sure you are connected to the Wi-Fi. Windows update will take plenty of data, so please make sure your internet connection has sufficient data and speed.
  6. You might see some options on your screen to update the windows.
  7. Please follow everything that you see on your screen to complete the updating process.
  8. On conclusion, restart your computer.
  9. Check if you have resolved the error effectively.

2. Manually Updating Drivers

Missing device drivers can also cause mup_file_system error on your computer, so installing and updating drivers can help in this problem:

  1. To update the drivers of your PC, navigate to the start menu.
  2. Search for device manager and right-click on the device manager icon.
  3. Select run as administrator.
  4. Look for the faulty device drivers with a yellow warning sign.
  5. The device drivers that have a warning sign next to them are corrupt and damaged.
  6. You need to select all such drivers and update them one by one.
  7. Once you have updated all drivers, please make sure to restart your device and check whether you have fixed the errors or not.
  8. If the error appears again, then follow the next solution.

3. Removing Externally Connected Devices

Sometimes externally connected devices can also cause fatal system errors. The mup_file_system error on your computer may arrive due to some faulty external connected devices. Some users have noted that a few particular computer peripherals can cause some technical issues. Therefore, you should check whether any device is causing the error on your computer. To do that, disconnect all peripherals from your computer and then connect each device one by one. While connecting devices one by one, check if the error appears again. If you get the same error message on your computer even after disconnecting all peripherals from your computer, it means the error occurred due to some other reason. Please follow the next solution to fix the error.

4. Remove Newly Installed Apps

Try to recall when this error started to appear on your computer? Was it started after installing a particular application? If yes, then please uninstall the recently downloaded and installed apps on your computer.

After removing the recently downloaded application, restart your computer and check if you have successfully terminated the mup_file_system error.

We expect that the solutions you read in this article were helpful and beneficial for you.

Source:https://ijstartcanonn.directorycrew.com/how-to-fix-mup_file_system-error-windows-10/

Here’s How One Can Remove Inbuilt Apps from Apple Watch

 iPhone, iPad, or other iOS devices, Apple Watch also comes with some pre-installed applications that one can access easily. Some of the inbuilt apps on your Apple Watch can be useful. But not all apps can be important all the time. In fact, we all have some of the softwares on our devices that we do not use on a regular basis. They just consume extra space on our gadgets. And Insufficient storage space on your device can affect their performances by making them slower. So, if you want to improve the performance of your devices, you need to free up some space. You can do so by uninstalling the apps from your smartwatch that are of no use to you. Removing the apps from the Apple smartwatch is not a complicated task. Any of the users can do so in a much easier and quicker way.

Do you also use an Apple Watch? Want to remove some unused inbuilt apps from your smartwatch but don’t know how you can do so? Well, if you are a new user of this smart device and are unable to find a way to remove the unused inbuilt apps from your Apple Watch, then you have arrived on the right page. In the following article, we will show you the technique for performing this task. So, if you want to see the methods for removing the unused inbuilt apps from your Apple Watch, you will have to go through this complete post.

The Techniques for Removing the Inbuilt Apps from Apple Watch

For removing any third-party apps from your Apple Watch, you can use the Watch app on your iPhone. Or you can also perform this task right from your smartwatch. But, if you want to delete any inbuilt apps from your Apple smartwatch, you will have to do it right from your smartwatch. There is no way you can delete the inbuilt apps from your smartwatch using your iPhone. So, to perform the following task of removing the inbuilt apps from your Apple Watch, please take a look at the below-mentioned instructions.

The Steps to Remove the Inbuilt Apps from an Apple Watch

Here are the steps that any Apple Watch user should follow to remove the inbuilt apps from their smartwatch.

❖    To get started with the task, first of all, press the Digital Crown on your Apple Watch to open the app grid.

❖    And now, if you are viewing the apps on your device in the List view, you need to change it to the Grid view. To do so, you need to press long on the app list and then choose the option of “Grid View.”

❖    And then, in the grid view of apps, tap and press long on the screen, after which the apps will start to wiggle on your smartwatch screen.

❖    And after this, you will be able to drag the app icons to rearrange them. And to delete an app, simply tap on the “X” icon located in the corner of the app icon. And that’s it.

So, that is how one can remove the inbuilt apps from their Apple smartwatch. Try the steps now if you also own an Apple Watch. And if you wish to explore the smartwatch features, then please go through our website.

Source:https://webrootsafekeycode.unicornplatform.page/blog/heres-how-one-can-remove-inbuilt-apps-from-apple-watch/?nocache=13094

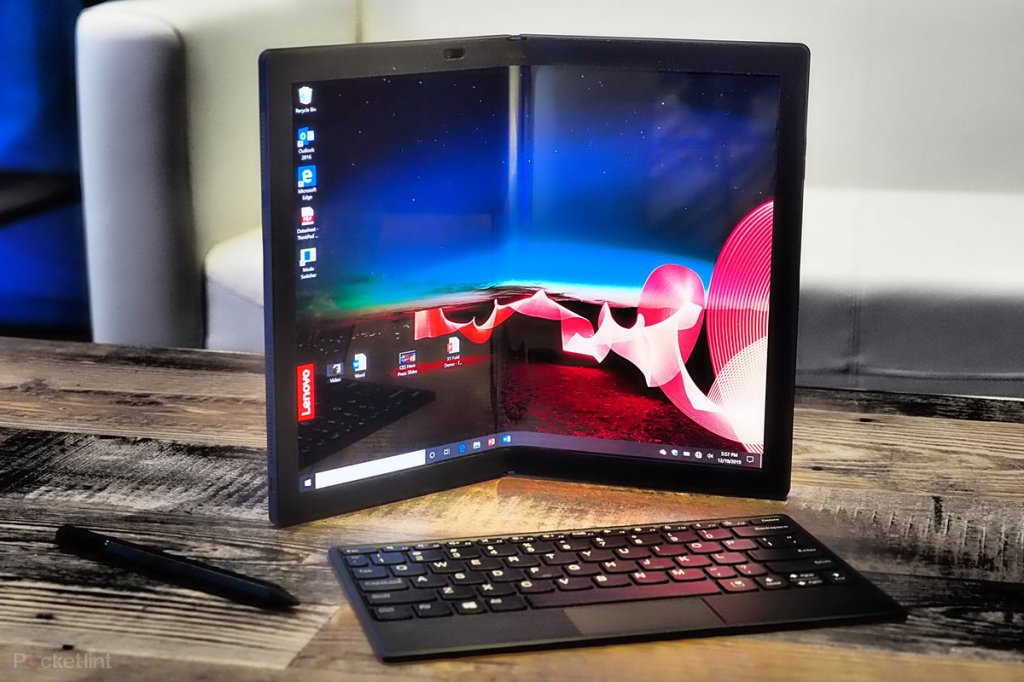
Lenovo ThinkPad X1 Fold Review – It’s All About the ‘Experience

 According to Lenovo, ThinkPad X1 Fold is the world’s first laptop with a folding display. However, the device might easily be categorized as a convertible based on its appearance. Those who want to use the X1 Fold’s foldable OLED display, on the other hand, will have to dig deep into their pockets. The most affordable Campus versions start at around $3,295, while regular customers will have to pay a bit over $3,413.

Price and configurations

ThinkPad X1 Fold costs $2,500. An Intel Core i5-L16G7 processor, 8GB of RAM, and a 256GB SSD are included at this pricing.

However, for the “ooh” factor, you’ll want the ThinkPad X1 Fold’s external snap-on keyboard and pen, which will bring your total to $2,749. Do you need additional room for your belongings? The X1 Fold is available with either a 512GB or 1TB SSD ($2,899).

Design

Many firms would announce technology like this but never deliver it. The ThinkPad X1 Fold weighs 2.1 pounds and feels solid in hand. The Surface Pro 7 (1.7 pounds) and the 12.9-inch Apple iPad Pro (1.4 pounds) are lighter.

However, for those who require a real keyboard, the ThinkPad X1 Fold is somewhat heavier with its optional keyboard, weighing 2.5 pounds vs 2.4 pounds for the Surface Pro 7 with a keyboard connected.

There are two USB-C connections on the X1 Fold, one for charging and connecting peripherals like the Mod Pen.

Durability

Although the ThinkPad X1 Fold doesn’t scream “rugged,” we’re glad to learn that it can take a beating and keep on ticking. It passed 12 MIL-STD-810G-rated tests, which are very specified ruggedness tests for sand and dust, severe high and low temperatures, vibration, shock, and humidity, among other things.

It also has a very sturdy feel to it. When you open and close the ThinkPad X1 Fold, everything appears and sounds as if it will last – and it should, because Lenovo put it through thousands of cycles. Aside from the pleasant “chunk” sound it makes when closed. The X1 Fold is completely silent throughout the process.

Consider it a book made up of two large sections with a hinge hidden behind the leatherback. A ribbed area on the bezel, on the other hand, allows the device to fold and unfold without causing wear and tear. When you open and shut the X1 Fold, you’ll see a little bar-shaped spine.

Display

The display on the ThinkPad X1 Fold attracts fingerprints. The 13.3-inch, 2048 x 1536-pixel OLED panel is the next best thing to traveling. Moving windows between the sides while it was not completely flat, on the other hand, did not feel as pleasant.

This is because the X1 Fold’s touch screen necessitates an extremely forceful touch. Because your fingertips are so close to the screen when grasping it by the bezels, this is likely to avoid inadvertent actuation when you’re holding it like a book.

X1 Fold’s display emits 147 percent of the sRGB color spectrum, beating out the iPad Pro’s 123 percent, the Surface Pro 7’s 97 percent, and the XPS 13’s 98 percent.

However, it did not perform as well in terms of brightness, delivering an average of 301 nits. Much brighter are the iPad Pro (559 nits), XPS 13 (469 nits), and Surface Pro 7 (395 nits). When I saw the magnificent 4K beach video darken a tad (not very significantly) from 30 degrees to the left and right — with beaches seeming somewhat browner and calm waters not popping — that lack of brightness became apparent.

Audio

The sound quality of this laptop will be affected by the position you place it in because one of its speakers will be forced against your surface, muffling the sound — but it should sound fantastic regardless of how you position it. You expect a device to perform well in all modes when you buy it for its versatility.

Performance

The Intel Core i5-L16G7 processor with 8GB of RAM isn’t up to par with the competition. The Surface Pro 7’s 1,794 on the Geekbench 5 benchmark is a fraction of the 5,254 on the Dell XPS 13 (with 11th Gen Core i7 CPU and 8GB of RAM), the 4,720 on the iPad Pro (A12Z Bionic), or the 4,443 on the Dell XPS 13 (with 11th Gen Core i7 CPU and 8GB of RAM) (Intel Core i5-1035G4; 8GB of RAM).

It also performed poorly in the video conversion test. On the X1 Fold, Handbrake converted a 4K movie to 1080p in 33 minutes and 31 seconds, which was 15 minutes longer than the XPS 13 (18:22), and less than a minute longer than the Surface Pro 7’s already bad 32:47.

At the very least, the X1 Fold has a good SSD, since it replicated roughly 5GB of files at a pace of 445 MBps, which is faster than the Surface Pro 7’s 267 MBps. However, the XPS 13’s 728 MBps rate outperforms the competition.

And there’s more bad news for gamers. On the X1 Fold, Civ VI (at 1080p) performed at a sluggish 9 frames per second, significantly slower than the XPS 13’s average of 16 frames per second.

Consider it a book made up of two large sections with a hinge hidden behind the leatherback. A ribbed area on the bezel, on the other hand, allows the device to fold and unfold without causing wear and tear. When you open and shut the X1 Fold, you’ll see a little bar-shaped spine.

Battery life

If you’re expecting that the X1 Fold’s portability means it was built to last a long time on a single charge, I’ve got some terrible news for you. On the battery test, it only lasted 6 hours and 3 minutes (web surfing at 150 nits of brightness).

Its competitors lasted far longer, with the Surface Pro 7 (7:52) lasting over two hours long, the iPad Pro (10:16) lasting four hours or more, and the XPS 13 (11:07) lasting nearly twice as long.

Webcam

Selfies taken with the X1 Fold’s 3.6-megapixel camera are blurry, just like the ones I’ve taken on computers. Yes. Despite the fact that this sensor is sharper than the majority. The photos I took with the ThinkPad X1 Fold were not particularly crisp. It’ll suffice for your next Skype conversation, but it won’t make a good first impression.

Verdict

When it comes to the hardware, Lenovo has nailed it with a robust hinge and a fantastic OLED display. The software optimization is the only area where the ThinkPad X1 Fold falls short, with a few areas for improvement in multitasking, USB-C audio, and more. The Lenovo ThinkPad X1 Fold is one of those laptops that everyone would like to add to their collection because of the outstanding hardware and Lenovo’s promise to fix these minor flaws with updates. However, the market for folding laptops is only going to grow better from here, as technology improves.

Source:https://setup0fficesetup.wordtypo.com/lenovo-thinkpad-x1-fold-review-its-all-about-the-experience/


How to Fix the ‘This device cannot start code 10’ error message?

 Have you encountered “This Device Cannot Start, Code 10” on your Windows 10 PC? If yes, then this article will help you troubleshoot it with some useful methods. You may get very anxious when you see this error message on your screen since it will prevent you from performing some essential tasks on your computer. This error can also prevent you from using your computer, and you won’t be able to access a single item on your computer. It can leave you helpless, and you will find it very disappointing.

Resolving this issue without proper knowledge about Windows 10 errors is like flying a plane without training, as you could make the situation even more unfavorable.

Some experts have investigated this issue, and they have found some practical resolutions to troubleshoot this problem. We advise you to go through this article as it contains some really effective information regarding this error. If you go through this whole article, you will be able to troubleshoot this problem effortlessly.

So what are you waiting for? let’s dive in…

Error code 10 on Windows 10

If you get the error code 10 on your computer screen saying, “This Device Cannot Start, Code 10,” then you should never ignore it. Commonly users get this error on their computer when they connect a physical device to their computers, such as a portable USB storage device or a printer. Whenever you connect a new device to your computer, your computer tries to install the device’s compatible drivers. In some cases, the operating system may not be able to install the required driver on your computer. As a result, you will get this error on your computer when a device cannot start due to not having a correct device driver.  

While this error is quite frustrating, you can fix it with the instructions provided on this page. Please make sure to follow each given method to deal with your problem.

Method 1: Restarting Your PC

You may have heard about this solution many times because it is one of the most simple and highly impactful resolutions for computer software and hardware issues. Since this issue occurs due to not having proper device drivers on your computer, restarting the computer will continue the driver reinstallation process, fixing the “This Device Cannot Start, Code 10” error. Please give this method a try and see if you can fix the issue with this simple cure. In case the error persists even after the restart, see the next process below.

Method 2: Use the Hardware Device Troubleshooter

All Windows versions come with a built-in troubleshooter feature. Windows 10 also includes a hardware device troubleshooter for analyzing and resolving the device and software-related errors. It would be handy if you use it in your problem, and it may automatically fix the problem itself. To use it on your computer, you can read the instructions given below:

  1. All you have to do is open the Command Prompt with the administrator privilege on your device and then enter a command to run the hidden system troubleshooter.
  2. To do so, first, open the start menu on your computer.
  3. Search for Command Prompt in the search menu
  4. Right-click on it when it comes in view in the results.
  5. Go for the option that reads, Run as Administrator.
  6. This will launch the Command Prompt as the administrator.
  7. Now please enter the “msdt.exe -id DeviceDiagnostic” command into the command prompt window.
  8. After that, please hit the Enter key on your keyboard. 
  9. Hang on and let the command run the troubleshooter.
  10. The troubleshooter will automatically scan your whole device for ongoing errors and technical problems.
  11. The utility will automatically fix the error and rebuild all missing drivers and files on your computer.
  12. When the scan completes, make sure to restart your computer and check whether the problem is gone or not.

The above solutions will effectively resolve the problem on your computer, and hopefully, you will not face the “This Device Cannot Start, Code 10” error on your computer again.

Source:https://nor4tonhomesetup.com/how-to-fix-the-this-device-cannot-start-code-10-error-message/


A Guide to Turn On the Ultra Power Saving Mode in Samsung One UI 3

 Do you own a Samsung device? Samsung is one of the most popular brands that produce various electronic devices for its users. Every device designed by this company includes a lot of great functionality that one can easily access to enhance their experience. Samsung smartphones are also one of the most commonly used devices that comes with many great features. These smartphones come with the company’s own custom UI. And within this version, the company has made several improvements and has included several useful features also. And here, we are talking about the ultra power saving mode that comes with these smartphones. Before introducing the One UI 3.0 for the Samsung smartphones, the users of the Samsung Galaxy smartphone series were provided with a choice of power-saving mode presets. And each used to limit the different aspects of the device.

Now, with the ultra power saving mode, the users will be able to customize the options for saving the battery on their smartphone. Enabling the ultra power saving mode on Samsung One UI is a pretty easy task. And if you also use a Samsung smartphone on which you want to enable this functionality, you will need to read this complete article. The following post will show you what you will need to do to activate the ultra power saving mode in Samsung One UI 3.

The Procedure for Enabling the Ultra Power Saving Mode in Samsung One UI 3

Our devices have now become an integral part of our life. Whether we use a smartphone, tablet, or computer, we face battery issues on all our devices. And by enabling the ultra power saving mode, you can make the battery life on your Samsung smartphone last longer. And for enabling the functionality, you will need to follow the below-mentioned instructions. Please take a look at the steps to proceed further:

  • To get started with the method of enabling the ultra power saving mode, firstly, you will need to make sure that you are running One UI 3.0 on your smartphone. And then launch the Settings application on your device.
  • On the Settings window, scroll down and choose the option that says “Battery and Device Care.”
  • And after you reach the battery settings screen, you will have to tap on the “Battery” option.
  • And now, you will be able to view a toggle button placed next to the option of “Power Saving Mode.” You will have to turn on the toggle button to enable the option.
  • And if you want to customize the options for the power saving mode, you can do so by tapping on the “Power Saving Mode” option. And now, you can toggle the switches for customizing the options. And that’s all.

So, this is all about turning on the ultra power saving mode in Samsung One UI 3.0. If you also own a Samsung device, then try out the feature now by following the mentioned steps. And to get more information, please take a look at our website.

Source:https://ijstartcanonsetuptrtr4500.directory2021.com/a-guide-to-turn-on-the-ultra-power-saving-mode-in-samsung-one-ui-3/


Every Detail About Samsung Galaxy M32 Smartphone

 Samsung Galaxy M32 is the latest Samsung mid-range phone to launch. It is also the successor to the popular Galaxy M31 from last year. It is a budget-friendly smartphone with a lot of great performance and features.

Design & Build Quality

The design has been an upgrade over its predecessor. The Galaxy M31 had a boring look compared to M32. The design has introduced some good rework here. It feels more like a smaller & compact variant of the Galaxy M62.

Samsung Galaxy M32 Blue

However, the back panel and frame are still polycarbonate. Samsung has also offered vertical lines at the back. It has refreshing color options. The build quality is also ergonomic.

Display & Ports

Samsung Galaxy M32 has a 6.4-inches full HD plus display. It has an AMOLED screen with a 90 Hz refresh rate. However, it doesn’t feel smooth. It might be because of the processor. The display has great quality. In other words, it has excellent contrast with accurate colors. You can also get plenty of brightness.

The buttons are made up of plastic, but they also have a decent build quality. Sim tray supports dual-nano sim and additional Micro-SD space. On the bottom of the phone, you will get a 3.5 mm headphone jack, a USB-C port, and a speaker grip.

Camera Setup

You will get a quad-camera setup on the Samsung Galaxy M32. It includes a 64 MP primary camera sensor, 8 MP ultra-wide camera sensor, 2 MP macro camera lens, and a 2 MP depth sensor. The selfie camera has a 20 MP camera sensor, and it seems like a downgrade from M31 because it had a 32 MP selfie camera sensor. In short, you will get saturated and detailed images with excellent dynamic range and focus.

Fingerprint Sensor

Samsung Galaxy M32 has a side-mounted fingerprint sensor. The sensor is also pretty reliable. You will not get much delay while unlocking the device. The fingerprint sensor is situated on the power button that sits just below the volume rockers.

Specifications

Samsung Galaxy M32 supports dual 4G networks. However, you will get the UFS 2.1 standard storage option in the device. EMMC storage is slower and time taking in everything from installing apps to opening them.

It has a storage option of 64 GB and 128 GB. You can also choose the RAM based on your required performance. It has 4 and 8 GB RAM options available. You will only have to pay a couple of extra money.

Performance

Samsung Galaxy M32 has a smooth user interface, but sometimes you might feel micro lags in the smartphone. You can expect the overall performance of this Helio G80 power chipset to match other smartphones in the market for the same price range.

You will get a stable frame per second in most multiplayer games like BGMI. However, the graphics do not compare to another Snapdragon chipset.

Battery

Samsung Galaxy M32 has a 6000 mAh battery, but it does not feel heavy or bulky to hold. It weighs less than 200 grams. The battery is the main highlight of this smartphone. However, the chipset included is not energy efficient.

You will get a 25-Watt power delivery charging support, but it comes with only a 15-Watt adapter.

Price

Samsung Galaxy M32 will cost you about $190 to $280. Users can also check the official websites to get more offers and deals. You will get one adaptive fast charging adapter, one USB-C charging cable, documentation, and the smartphone itself. In other words, you will not get any protective case within the box.

Conclusion

Samsung Galaxy M32 is another solid mid-range smartphone. However, performance is not its main highlight point. As a result, if you are a gamer, then there are also some better options in the market at the same price range. If you prioritize multimedia consumption and camera performance over everything else, then Samsung Galaxy M32 is a great choice for you.

Source:https://ijstartcanonijwirelesssetup.directory2021.com/every-detail-about-samsung-galaxy-m32-smartphone/

The Latest Google Meet Update is Here: Full Details

Google Meet is receiving a slew of new meeting management capabilities for free and Workspace users. The search engine behemoth said that customers wished for the extra features. There’s also a new moderation and safety feature, as well as an enhanced Quick access option. Notably, Google states that not all capabilities will be accessible to all users.

Google stated on its Workspace blog that users of Google Meet would be able to give permissions to hold a meeting to up to 25 co-hosts. This is done by assigning these users to the People panel’s Hosts permissions. Each co-host will have access to use the host’s controls.

Through the Quick access options, hosts and co-hosts may now manage who can share screens, send chat messages, silence all participants with a single click, terminate the meeting for all participants, and control who can join the meeting and how they join the meeting.

Quick access options allow participants from the same domain to join the meeting through Google Meet mobile or desktop or dial-in. The fast access option is enabled by default. If disabled, guests must wait for the host to join the meeting; only invited participants may join; others must be granted permission to participate. And no anonymous user will be able to join. Finally, only the meeting’s host will be able to leave the meeting if Quick access is disabled.

The search giant has also modified the People panel to allow searching for a meeting attendee. Users may be silenced, removed from the meeting, or given co-hosting rights. Co-hosts have a security shield icon.

It will be gradually rolled out to Android and Web users beginning August 16 and iOS users starting August 30.

All Google Meet users would be able to access the moderation and safety settings. Users of Google Workspace Individual and personal Google Accounts would not be able to use the Quick access option, but everyone else would.

For Google Workspace Essentials, Enterprise Essentials, Enterprise Standard, Enterprise Plus, Business Standard, Business Plus, Education Fundamentals, Education Standard, Education Plus, and Teaching and Learning Upgrade users, the functionality would be accessible. However, Google Workspace Business Starter, Frontline, and Nonprofit users, as well as G Suite Basic and Business subscribers, will be unable to access it. So, for now, it is not accessible to all users, but Google may add it later.

Google Meet adds third-party whiteboarding tool ‘Miro’

Google Workspace aims to incorporate third-party solutions into users’ current workflows. Next year, Google Meet will get Miro.

In addition, Miro provides a collaborative whiteboard that already works with G Suite. Shared documents may be integrated into a Miro canvas for fast viewing and modification. You can link files, create sticky notes, utilize emojis, and set timers.

Another approach is to connect Miro boards to Google Calendar invites so that everyone attending the event is ready to work. For calls in early 2022, Miro will connect with Google Meet. People’s video streams display on the right, with Miro as a “Collaboration” activity on the left.

Users will soon be able to start a Meet call from inside their current Docs window using a similar panel UI. Google is continuing to extend Meet’s availability by allowing third parties.

As a collaborative tool, Miro is similar to Google’s Jamboard software, which has a large educational user base.

Overall, third-party applications help consumers get their job done by allowing them to utilize their favorite programs. This is ultimately increasing the user base of Google Meet as people come to know that they are going to get all in one place.

Source:https://ijstartcanonijsetup.directory2021.com/the-latest-google-meet-update-is-here-full-details/

5 Alexa Games to Enjoy with Your Family

  As it turns out,  Alexa  can do more than just create routines, run your smartphone, set reminders, and play songs. Your Alexa can be the ...